Showing posts with label cosplay. Show all posts

Friday, November 29, 2013

Weeping Angel Costume


Last year I found a guide to making a Weeping Angel costume, and decided to use it (with some changes) as a basis for creating my Halloween costume this year.

These are my notes on the changes I made and what did and didn't work.

The mask was one of the easiest things.  A basic store-bought plastic mask, with the details built up using PlasticWeld epoxy putty (plumber's putty, from Home Depot).


Because the angel's mouth is open, it actually extends down over the mask's chin and I had to add extra chin with the putty. 

 
I cut the plastic out of the mouth area and added in the fangs.


A couple of layers of paint turned it to "stone" (matte for the top layer, angels aren't shiny).


For comfort, I lined and padded the mask with toweling material.  I also enlarged the nostril holes (hidden by the mask's nose) and glued a strip of black stocking material behind the teeth to hide my chin from showing through the mouth.


The mask was reasonably comfortable but the epoxy putty made it heavy.  I might try to recreate it with a lighter modelling clay like Crayola Model Magic.

Next, the wig.  This was very last-minute as I was running out of time. 


I agree with the author of the blog I was referencing: it might be better to model out of clay instead; the yarn is difficult to work with.


Next, the wings.  I wanted to do these differently from the blog I was referencing, because I wanted to be able to detach the wings for portability, and I wanted to try and design the wings and dress so I wouldn't need a second person to help me change into it.

First step was to take apart a backpack with comfortable padded straps to make a harness.  I found some PVC pipes at the hardware store that were a perfect fit to be a socket and support for the wings.  I attached these to the backpack padding, and added an extra strap with velcro closing to ensure they were supported firmly upright.
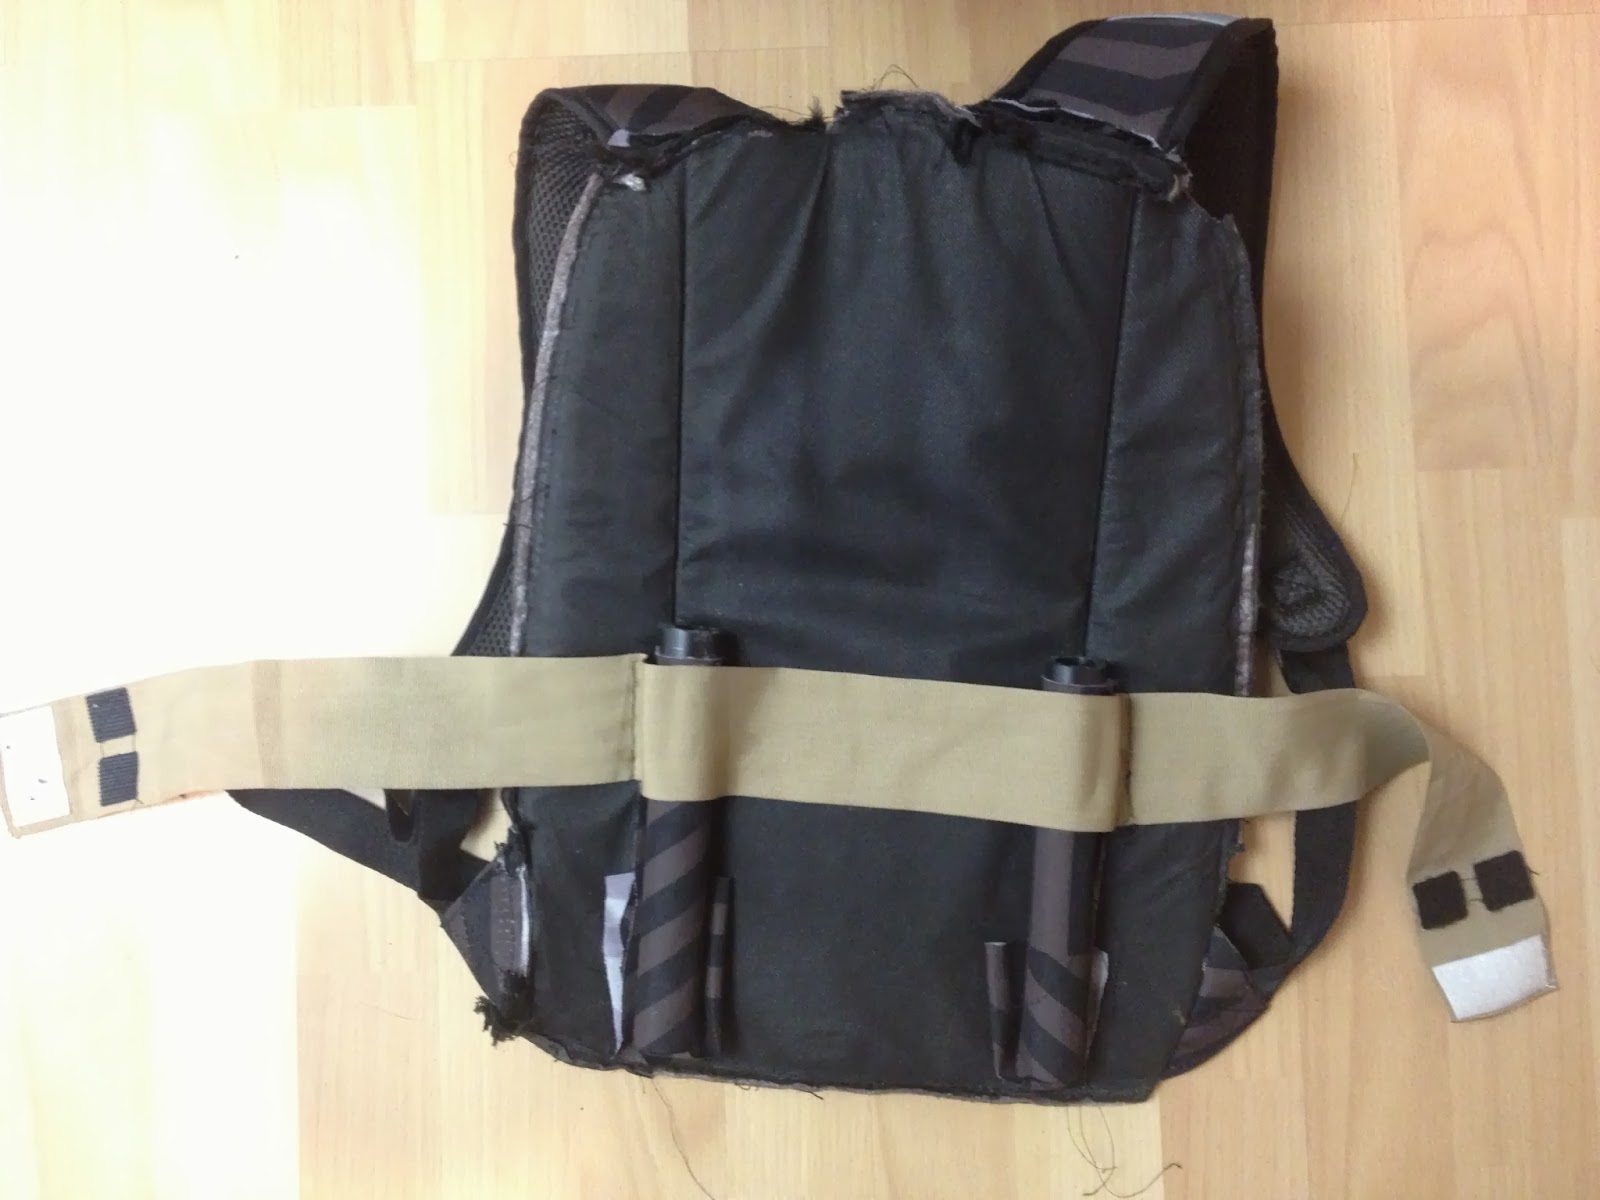


The wings are made of hard foam sheets from the craft store, glued firmly together in layers.  Initially I tried using duct tape to secure the foam to the PVC pipes, but duct tape doesn't stick well to styrofoam, so I ended up using glue.

Here are the wings, partially made, slotted into the harness:


Wing showing the pipe that slots into the harness:

 Detail on a wing showing the layers, and the carving of the feathers.  I was hoping the paint would cover up the joins between sections of foam better, but it's really only visible at this one place:


Next, the dress.  I wanted a comfortable top, so I picked up a cheap sweatshirt at a second hand shop and chopped off all but the shoulders.


Apart from the shoulders, the dress was made from a dark grey cotton fabric, essentially a tube sewn so it hung in folds. 


The front was sewn to the sweatshirt top, but I didn't sew the back so it could be closed with velcro.   This is how the back looked after painting, when the velcro is closed up:


And with the velcro opened, two vertical slits (hidden in the folds) allow the wings to be slotted through to the harness underneath:


For the arms, I tried the instructions in the original blog.  I used grey stockings, cut and sewed into gloves, and painted them.  


Not only was sewing the gloves a lengthy pain, it was also uncomfortable and the arms were still more transparent than the rest of the costume.  It didn't look awful, but it didn't look perfect either.  I used a stocking hat as well to cover my ears and neck, however, I also had trouble with the neck creeping up and it had to be pinned to stay in place.

I've already bought a lycra bodysuit to paint and see if it makes a better substitute.

Here's how the costume (minus arms and wig) looked on a mannequin,, not yet fully painted:


After taking this photo, I went to work leaving it here just inside the front door, and forgot all about it when I came home in the evening. Almost gave myself a heart attack bumping into it in the dark!

Here's me at the SOE Halloween party. You can see the difference in the transparency of the arms:


The other problem was that I didn't realize how much the wings would swing around when I was moving.  On a stationary dress mannequin it wasn't a problem, but when walking I had to constantly adjust them or hold them.  I need to revise the wings to prevent them from swinging sideways.

Before wearing this again, I will try using a bodysuit instead of the stocking arms, and redesign the wings to stop the swinging.  Possibly also redo the mask with a lighter clay.

Overall, it was fun and challenging to make, but not at all comfortable to wear.  OK for a short costume contest, but I couldn't have worn it comfortably for any length of time. Still, it looked good enough that I tied for first prize and freaked out a few people by following them around!
Here are some of the final greenscreen photos from the SOE party.


Thursday, November 01, 2012

Wonder Woman costume

All the Avengers and other super hero costumes last year inspired me to try a Wonder Woman costume for Halloween 2012.  I loved the old Lynda Carter TV show way back when it was new, so I started looking at the details of her costume:


After making my Felicia Day "Codex" costume 3 years ago, and sewing the corset from scratch, I swore I was never going to do that again, so the first task was to find a corset of the right color that I could use as a base.

To the rescue: sexy "Santa Baby" costume, which I think was from Amazon, or possibly ebay:


The straps were already removable, and the hat, belt, and g-string no use, but the corset itself was just the right colour and a good starting base.

However, this corset had metal hook-and-eye fastenings up the front, and laces up the back, which were both problems.  I unpicked the stitches and removed both.  The front had to be solid fabric, because the gold eagle would be sewn on top of it; and the laces at the back looked wrong for Wonder Woman.  I sewed both up, and instead unpicked the side seams and sewed in zippers.

Since removing the laces and the hooks made the corset width smaller, it was now too small, and I needed to add some extra fabric at the sides also so I could fit into it! Fortunately, a matching red satin was pretty easy to find at the local fabric shop.

Once the corset fit comfortably, it was time to sew on the golden decorations.  The fabric shop also had gold spandex and thread, so I sewed a lot of gold tubes, and the cat was VERY helpful as I tried to lay out the eagle wings.


The spandex was a real pain to sew; I think I wasn't using the right type of needle, but I'm definitely going to avoid spandex again as much as possible!  However, eventually the feathers and then the eagle and rest of the gold detail were in place, and the top was done.


I didn't try to make the outfit a one-piece; I ordered some stretchy blue athletic shorts from Amazon and simply sewed some white stars onto them.  Comfortable and not too high cut.


The shorts were still fairly short however and female super hero costumes tend to be rather more revealing than male ones, and since I'd likely be wearing it around work colleagues, I decided an added skirt would be appropriate. I came across this great blue gauzy material with silver stars in the "seasonal" fabric section: apparently it's Christmas-y?  It was perfect for a skirt.  And, apparently, a cat tent.


Rather than make a full skirt, I just sewed the fabric to some more of the gold spandex as a waist band and added a fastening at the front so it would be open at front, but long at the back.  I also sewed lots of gathers into the skirt so that rather than hanging down straight, it hangs in gathers.

Wrist band and headband were easily sewn out of the same gold spandex.

I'd found the boots fairly cheaply on Zappos.com back around February, and I used white bandage tape to add the highlights. Add some flesh coloured stockings, and of course the invisible plane.

And so it was assembled!


This took a LOT of work, probably more than last year's dalek outfit, but everyone seemed to like it.  And it was actually pretty comfortable too - the headband (which was slightly too tight) and the contact lenses were the most uncomfortable parts.


Thursday, March 08, 2012

Dalek dress

Finally, the details of my costume from last Halloween!

To start with, I've been "aware" of Doctor Who all my life; having spent a couple years of my childhood in England (plus regular visits) I had watched it occasionally during the Tom Baker, Peter Davison, and Sylvester McCoy years as my cousins were big fans.  I was always a bit ambivalent; it was interesting but often scary to a kid, and I used to have nightmares about the daleks.  Although I'd sometimes watch it when other people had it on, I'd never watch it on my own.


So I didn't rush into the new episodes of Doctor Who when it was revived with Christopher Ecclestone as the newest Doctor.  I watched a bit of one episode and it looked very very cheesy and I didn't really like the heavy romance feel of Rose, so I avoided it for several years.  However, eventually I gave it another try and got pretty hooked.

I've learned since moving to the US that buying a Halloween costume off the shelf is not something I'm a fan of.  Here's how I felt my first year here:


And especially since almost all the Halloween parties I've attended have been with co-workers, I'm not too enthusiastic about wearing little more than underwear!  So after the first year I've been making my own costumes.  (Two years ago: Felicia Day's "Codex" outfit from "Do You Wanna Date My Avatar"; last year a pirate outfit.)  This year I came across a few pictures of dalek-themed dresses.  Here, for example.  I didn't like the way they were almost all mini-skirted, however.  Daleks are not miniskirted; daleks showing legs seemed silly (and back to the "sexy dalek" idea from the cartoon above).  I decided to make a full-length dalek dress and see how it turned out.

First stop: finding a skirt.  I could have sewn one (I did sew the skirt for the pirate outfit last year) but it would be quicker, easier, and quite likely cheaper if I could find something adaptable in a charity shop.  I actually found an appropriate dress very quickly at the local Salvation Army: a floor length black ball gown, which was even already lined with crinoline stuff to make it stand out more.  Perfect!  Of course, it was a full dress rather than a skirt, but that was easy to change.  About $9 for the dress; no way I could have bought that much fabric and lining and sewn one for cheaper.

I also hopped on eBay and found a plain black satin corset, which I ordered.  Under $15 including shipping. 

The first challenge I faced was finding something to make the bobbles on the skirt.  In theory any kind of foam ball should have worked, but after searching through quite a lot of sports and department stores, all I had managed to find was quite firm foam.  That would have looked fine, but if I wanted to actually sit down at all it would have been very uncomfortable.  I wanted to find something REALLY soft that would compress completely.  Eventually Amazon came to the rescue: I found 2 inch diameter sponge balls that were intended for magic tricks: Super Soft Sponge Balls.  At $35 this was the single most expensive part of the costume, but it turned out to be exactly perfect. They squish down into nothing at all and were just the right size.  


The sponge balls had been available in a variety of bright colours but I had decided on a traditional black-and-silver colour scheme so I ordered the black balls and picked up some silver spray paint and spent quite a while over several weeks cutting the foam balls in half and spray painting them silver.  This was probably the most time-consuming part of the costume, though not difficult.  Laying them out on the dress they seemed to be just the right size and I was able to estimate how many I'd need.


Next I converted the dress to a skirt by cutting off the top, shortening the side zip, and hemming the waist.  It didn't need to be beautifully finished since it wasn't going to be visible under the corset top anyway.  Once that was done I used a brand of "Goop" glue that's safe for both fabric and foam to glue the silver hemispheres onto the skirt.


What to do for the top half puzzled me for quite a while.  Leaving the corset plain black didn't look "dalek" enough, but converting the top half of a dalek into something stylized for the top half of a dress was a challenge.


After looking at many, many dalek photos I eventually settled on just some simple criss-cross silver ribbon, in a matte silver to match the spray-painted sponge balls.


And that was the basics of the dress done; all that remained was accessories.  The toilet plunger was easy, I just picked up a wooden-handled toilet plunger at the local supermarket and spray-painted the handle silver.  Done.


I didn't bother making something for my other hand, since I was clearly going to need a hand free to hold food and drinks and things anyway.  That left only my head.  Daleks have a central eyestalk-type thing and a couple small light-like things on each side.  At the local pharmacy I picked up a cheap wide black plastic headband and  a couple of small plastic bottles intended for travel-size shampoo samples or something like that.  I cut the tops off these and glued just the screw top part onto the headband.  Luckily I already had some little LED lights I'd bought for a steampunk costume I made earlier in the year, and one each of these fit perfectly into the bottle screw-tops.  The lights twist on or off, so I was able to just twist the lights on and drop them into the headband when it was time for the party.  

The central "eyestalk" thing was the most complex to make.  I bought a blue LED from Radio Shack, as well as a small section of circuit board and a battery clip, and I soldered these together and fixed them onto a bit of coathanger.  Then I found a bit of threaded black plastic tubing in the plumbing section of the local hardware store, and used this to hide the coathanger, so only the LED stuck out the end.  I used FIMO modelling clay to make a base for the coathanger which I could glue onto the headband, and I cut the middle out of another of the black sponge balls and slid it over the blue LED so it hid the battery and the end of the plumbing tubing.  The sponge ball was still soft enough that I could slide if off as needed to insert or remove the battery at any time.  Finally, I used some black construction paper to make a series of small "fins" to add to the tube, making the "eyestalk" look more complete.


At the last minute I also bought a pair of long fingerless black satin gloves and glued a spare silver hemisphere onto each.  Not really necessary, but I happened to see the gloves and they seemed to match.

And here are a few photos of the finished costume at work on Halloween:


When all's added up it probably ended up costing about $100, which is not an insignificant amount, but certainly less than you'd pay for a purchased costume of the same quality and it was a lot of fun to make.  And looked really good!  I hope to get a few more uses out of it in the future.

Saturday, November 07, 2009

G.I.R.L. blog: A Touch of Hero Worship

This week on SOE's GIRL blog I talked a little bit about Felicia Day, creator of the web series "The Guild":

A Touch of Hero Worship

What I didn't mention (as it wasn't quite finished when I actually wrote the post) was that I decided to dress as Felicia Day's character Codex from "Do You Wanna Date My Avatar" for Halloween this year.

And to do that, required a little bit of Real Life tradeskilling.

Fortunately, out of all the costumes from The Guild, Codex's looked to be the simplest to make.


Unfortunately, I'm really not that good at sewing things and can only plod along at the most basic level! I do have a sewing machine now (it was a Christmas present last year) but all I've made with it so far has been a small quilt, some curtains for the house, and some linings for bags I've crocheted. This was a step beyond that!

Still, I picked up some fabric and a corset pattern, and a white bra to use as the foundation of the dress, and learned a lot.  Mostly, I learned why people charge $500 for corsets they sell online.  They are a pain to make, even with helpful tips from the lady at the fabric store!  (Best tip:  use the large size plastic cable ties from Home Depot instead of commercial corset boning.  Much cheaper and generally stronger too!)

From this:


To this:


I broke 3 sewing machine needles in the process and ran out of time so the staff and accessories (like kneepads and bracers) are less detailed than I would like, but on the whole I'm pretty happy with it as a first attempt!  If I wear it again I may try to improve some of those details I didn't have time for this year.

(The Dr. Horrible lab coat was something I made last year.  We couldn't find a side-closing lab coat like Dr. Horrible's, so I converted a front-button one to a side-button one, added some details, and embroidered the little caduceus logo on the pocket - that caduceus along took almost 3 hours!)

The funniest observation came from "Dr. Horrible" as Halloween approached and I was madly trying to finish up the sewing.

"Are you going to dye your hair too?" he asked (since Codex/Felicia Day is in fact a redhead).

"Good grief no, that's way too much effort," was my immediate reflexive response.  At which he just looked at me for a moment and then pointed out that relative to the weeks of sewing effort I'd already put into the thing, dyeing hair really wasn't much effort at all.  And I had to laugh at myself a bit because it was very true.

Nonetheless I did not dye my hair. Probably because making the costume was interesting and a tradeskill challenge; dyeing hair is a nuisance and smelly and not fun at all.  You gotta draw a line somewhere, after all!

Anyway, as I said in the GIRL blog post, Felicia Day is a pretty impressive lady and a great role model for girls in gaming (for anybody, in fact).  If you haven't yet watched The Guild, visit their site, find season 1, and get started.  Episodes are very short, generally 3-7 minutes, and if you've ever played any MMO I guarantee you'll find it hilarious.  You can also buy the DVD now and support a great independently produced show.  And incidentally, I was not paid to say any of this ... it's just true.  So go do it.  =)