Showing posts with label RL crafting. Show all posts

Friday, November 29, 2013

Weeping Angel Costume


Last year I found a guide to making a Weeping Angel costume, and decided to use it (with some changes) as a basis for creating my Halloween costume this year.

These are my notes on the changes I made and what did and didn't work.

The mask was one of the easiest things.  A basic store-bought plastic mask, with the details built up using PlasticWeld epoxy putty (plumber's putty, from Home Depot).


Because the angel's mouth is open, it actually extends down over the mask's chin and I had to add extra chin with the putty. 

 
I cut the plastic out of the mouth area and added in the fangs.


A couple of layers of paint turned it to "stone" (matte for the top layer, angels aren't shiny).


For comfort, I lined and padded the mask with toweling material.  I also enlarged the nostril holes (hidden by the mask's nose) and glued a strip of black stocking material behind the teeth to hide my chin from showing through the mouth.


The mask was reasonably comfortable but the epoxy putty made it heavy.  I might try to recreate it with a lighter modelling clay like Crayola Model Magic.

Next, the wig.  This was very last-minute as I was running out of time. 


I agree with the author of the blog I was referencing: it might be better to model out of clay instead; the yarn is difficult to work with.


Next, the wings.  I wanted to do these differently from the blog I was referencing, because I wanted to be able to detach the wings for portability, and I wanted to try and design the wings and dress so I wouldn't need a second person to help me change into it.

First step was to take apart a backpack with comfortable padded straps to make a harness.  I found some PVC pipes at the hardware store that were a perfect fit to be a socket and support for the wings.  I attached these to the backpack padding, and added an extra strap with velcro closing to ensure they were supported firmly upright.
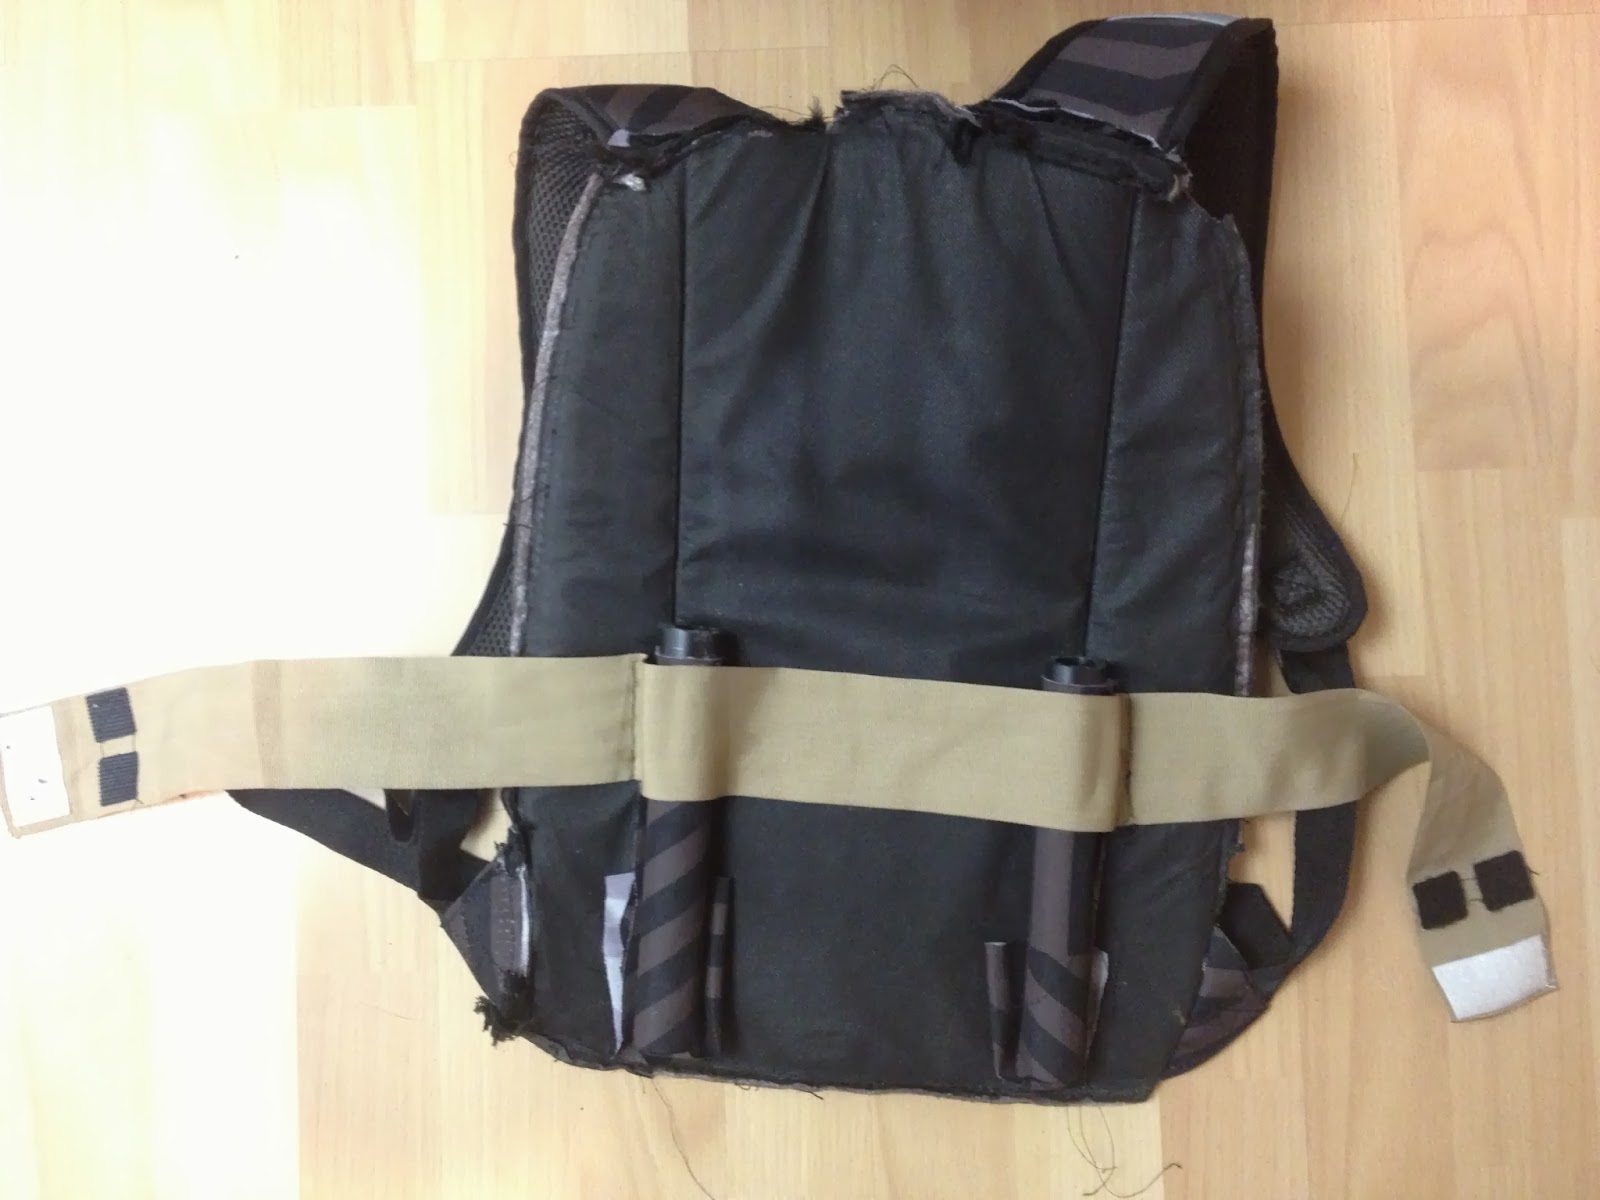


The wings are made of hard foam sheets from the craft store, glued firmly together in layers.  Initially I tried using duct tape to secure the foam to the PVC pipes, but duct tape doesn't stick well to styrofoam, so I ended up using glue.

Here are the wings, partially made, slotted into the harness:


Wing showing the pipe that slots into the harness:

 Detail on a wing showing the layers, and the carving of the feathers.  I was hoping the paint would cover up the joins between sections of foam better, but it's really only visible at this one place:


Next, the dress.  I wanted a comfortable top, so I picked up a cheap sweatshirt at a second hand shop and chopped off all but the shoulders.


Apart from the shoulders, the dress was made from a dark grey cotton fabric, essentially a tube sewn so it hung in folds. 


The front was sewn to the sweatshirt top, but I didn't sew the back so it could be closed with velcro.   This is how the back looked after painting, when the velcro is closed up:


And with the velcro opened, two vertical slits (hidden in the folds) allow the wings to be slotted through to the harness underneath:


For the arms, I tried the instructions in the original blog.  I used grey stockings, cut and sewed into gloves, and painted them.  


Not only was sewing the gloves a lengthy pain, it was also uncomfortable and the arms were still more transparent than the rest of the costume.  It didn't look awful, but it didn't look perfect either.  I used a stocking hat as well to cover my ears and neck, however, I also had trouble with the neck creeping up and it had to be pinned to stay in place.

I've already bought a lycra bodysuit to paint and see if it makes a better substitute.

Here's how the costume (minus arms and wig) looked on a mannequin,, not yet fully painted:


After taking this photo, I went to work leaving it here just inside the front door, and forgot all about it when I came home in the evening. Almost gave myself a heart attack bumping into it in the dark!

Here's me at the SOE Halloween party. You can see the difference in the transparency of the arms:


The other problem was that I didn't realize how much the wings would swing around when I was moving.  On a stationary dress mannequin it wasn't a problem, but when walking I had to constantly adjust them or hold them.  I need to revise the wings to prevent them from swinging sideways.

Before wearing this again, I will try using a bodysuit instead of the stocking arms, and redesign the wings to stop the swinging.  Possibly also redo the mask with a lighter clay.

Overall, it was fun and challenging to make, but not at all comfortable to wear.  OK for a short costume contest, but I couldn't have worn it comfortably for any length of time. Still, it looked good enough that I tied for first prize and freaked out a few people by following them around!
Here are some of the final greenscreen photos from the SOE party.


Sunday, March 17, 2013

Tradeskilling the Luck o' the Irish

Happy St. Patrick's Day!

Not a holiday I've ever paid much attention to, but apparently it's kind of a big deal around here.  Although this is not exactly how I'd ever pictured St. Patrick driving the snakes out of Ireland, I guess it could work!


Completely unrelated to the above photo (it was too good not to share), walking through the park near my apartment today I found 5 four-leafed clovers today and one five-leafed, in an under-20 minute walk. Luck o' the Irish for me this St. Patrick's Day, apparently!

Can you spot the four-leaved clover in this photo I took today?


(Hint: it's in tbe south-west quadrant.)

I seem to have a knack for spotting four-leafed clovers and have found several there before, and I never know what to do with them. So, I've been playing around with jeweler's resin. I tried small paperweights first, then had the idea to try necklaces.

Paperweights/keychain:


Necklace (first attempt):


I took some photos of making necklackes as I went. Tradeskilling ftw!

First: bought some jewelry findings.  I tried out a couple of different shapes, including sterling silver hoop (above) and rectangle (below).  Plus, some silver flat head pins.


Next, resin. I tried ICE jeweler's resin brand, from Amazon.  Mix equal parts from the 2 bottles:


Then pour into the jewelry findings. I tried a few shapes. I used masking tape on the back, and poured in just enough resin to cover the bottom.  Mixing causes a lot of bubbles which slowly come out as it hardens, but I found using a pin to help smooth them out also was useful.


It takes about 24 hours to harden fully. Next day, I removed the tape. It left a rough surface, but I flipped over each one, then added more resin on the back to make the back smooth.


Once that is hard, add the clover (or whatever else will go in the pendant) and cover with more resin to make a convex surface.

If using a clover or other plant, you need to press and dry it first. I'd previously pressed my clovers for at least a few weeks under some heavy books; if you don't, they may decay inside the resin which obviously doesn't look good. There are plenty of YouTube tutorials with detailed walk throughs.

Finally, once the resin was hard, I added a chain and some extra beads to finish it off as a necklace.


Since this one was a gift for someone who loves ladybugs, I also added a small ladybug charm I got from Etsy.


And a gift box - plain cardboard from Michael's:


Plus some paint and wire, which I already had lying around:


A little box of good luck and good wishes, ready to deliver!


Still not quite sure what to do with all the clovers I found today, but they're in a book now being pressed and dried.  These do make nice little gifts for friends who're needing a little luck. And, of course, great accessories to go with your St. Patrick's Day tutu!

Update: adding some photos of more clover pendants I've made since the original post!


Wednesday, November 14, 2012

Minecraft cake!


This is what a cake looks like in Minecraft:


A Minecraft cake is something I've been wanting an excuse to try making for a while, since I'm a big fan of Minecraft, and of cake. So what could be better than a Minecraft cake?  Duh, NOTHING!  This was made for fun and given away as an attempted peace offering. It was fun to make and pretty simple!

I used my super quick and easy egg-free cake recipe (see below - instead of chocolate chips I used a bar of orange dark chocolate, chopped up into small chunks), and a whisky-heavy dark chocolate butter cream icing.  Conveniently, I already had a whole tub of the home made buttercream icing made up in the fridge, since I've been making a lot of cupcakes and cakes for people having birthdays at work and at my former work.  As I made this, I found myself saying "it's always useful to keep a tub of chocolate buttercream icing handy in the fridge!"  ...Words that 10 years ago I would never have expected I'd find myself saying, but there you go.

So anyway, I needed two square cakes.  All I had was some square pyrex dishes, but I lined them with some parchment paper for ease of extraction and then trimmed the edges off once they were cooked to make them fully square and flat sided.


Cake trimmings: just as yummy as the cake. Although I gave the cake away, I did get to eat the trimmed off edges. Part of a nutritious and delicious breakfast!


Once the cake was cooked and cooled it went into the freezer overnight (because it's easier to frost a frozen cake). Meanwhile I was melting white chocolate chips in a plastic freezer bag, in a bowl of warm (but not too hot) water.  If you get chocolate too hot the texture changes and becomes all grainy, so you have to melt it very slowly and carefully.  Most of the white chocolate chips were melted in one big bag, as shown below, but I separated out a few into a smaller ziploc bag and added red food colouring to that bag only.


Once the chocolate was melted, I poured it out onto a sheet of parchment paper, used a spatula to smooth it flat into an approximate square, and covered with cling film to keep it clean while it cooled.


The red coloured white chocolate had to be mixed up carefully before the colour was smooth and homogeneous.  It was softer than the pure white due to the added colour, but that just made it a bit easier to work with.  It too was spread out flat to cool.


Once the sheets of chocolate were mostly but not entirely cool, I used a sharp knife to cut them into squares.  If the chocolate gets too cool it'll just shatter when you try to cut it, so it needs to be cut before it's totally cooled.

Next day I removed the cake from the freezer and put the first layer of cake into the container it would be delivered in, and covered it with buttercream icing.  You don't have to freeze the cake, but it has to be cool (or the buttercream will melt) and it's much more crumbly if it's not frozen which makes icing it neatly a lot harder.

The container is just a simple clear box with lid picked up from an office supply store.  The base of the container is a layer of cardboard which (a couple days before) I'd cut to fit the container, and painted to look like a sheet of Minecraft grass, and then wrapped in cling film.  It took a little extra time to make this base, but it ended up looking great!


Once the first layer of the cake was iced top and sides, I put the second layer of cake on top, and also covered it in butter cream.  Once that was in place, it was time to start decorating.  The sheets of white chocolate had been cut up into squares previously and stored in the freezer to keep them hard.  I placed the white chocolate squares so they covered the top, with small spaces in between to keep the pixellated look.  Around the upper edges I placed full and half squares, alternating, to look like the Minecraft cake edge you see above.  Technically I should have done 7x7 squares instead of 5x5 to be completely accurate, but I failed to plan this well enough when cutting the squares. This was easier anyway and still looks good!

Finally, on top of the white chocolate, a few red chocolate squares of varying sizes, to match the pattern of the Minecraft cake as much as possible.


I'm definitely not a very skilled cake decorator so I was happy this worked, and was also pretty easy.  I think it turned out really well, although I will improve a few things for next time.

Ta da!  Minecraft cake!  Looks awesome and tastes absolutely delicious.


Egg-free chocolate cake

3 oz salted butter
2 oz cocoa powder
8 oz (1cup) sugar
7 oz all-purpose flour
½ tsp baking powder
½ tsp baking soda
½ tsp salt
1/3 cup organic apple sauce (note: this substitutes for 1 egg)
2/3 cup water
½ tsp vanilla
½ cup mini dark chocolate chips or your favorite chocolate of choice

Melt butter gently and allow to cool for a minute or two. Add everything else except chocolate chips and mix well using a fork or whisk until smooth. Add chocolate chips (can either mix in, or leave sprinkled on top). Pour into a cake pan and bake in a preheated oven at 350F for about 30 minutes, until a toothpick stuck into the middle comes out clean. Wait until cool (refrigerate or freeze so it won't crumble when being iced), then cover with the icing below. (You can also use this recipe to make cupcakes, these will bake faster in about 20 minutes so check sooner.)


Buttercream icing

4 oz (½ cup) salted butter, at room temperature
2 cups powdered confectioner's sugar
1-2 shots of whisky or other strong alcohol (e.g grand marnier, brandy, rum, Bailey's) or cream
½ cup cocoa powder (or more, for a stronger chocolate taste)

Mix well, adding more liquid if needed to soften up. Spread on cooled cupcakes then refrigerate. 
 
Note: the icing ingredient measurements are pretty flexible - add more or less of anything according to whatever tastes good!

Thursday, November 01, 2012

Wonder Woman costume

All the Avengers and other super hero costumes last year inspired me to try a Wonder Woman costume for Halloween 2012.  I loved the old Lynda Carter TV show way back when it was new, so I started looking at the details of her costume:


After making my Felicia Day "Codex" costume 3 years ago, and sewing the corset from scratch, I swore I was never going to do that again, so the first task was to find a corset of the right color that I could use as a base.

To the rescue: sexy "Santa Baby" costume, which I think was from Amazon, or possibly ebay:


The straps were already removable, and the hat, belt, and g-string no use, but the corset itself was just the right colour and a good starting base.

However, this corset had metal hook-and-eye fastenings up the front, and laces up the back, which were both problems.  I unpicked the stitches and removed both.  The front had to be solid fabric, because the gold eagle would be sewn on top of it; and the laces at the back looked wrong for Wonder Woman.  I sewed both up, and instead unpicked the side seams and sewed in zippers.

Since removing the laces and the hooks made the corset width smaller, it was now too small, and I needed to add some extra fabric at the sides also so I could fit into it! Fortunately, a matching red satin was pretty easy to find at the local fabric shop.

Once the corset fit comfortably, it was time to sew on the golden decorations.  The fabric shop also had gold spandex and thread, so I sewed a lot of gold tubes, and the cat was VERY helpful as I tried to lay out the eagle wings.


The spandex was a real pain to sew; I think I wasn't using the right type of needle, but I'm definitely going to avoid spandex again as much as possible!  However, eventually the feathers and then the eagle and rest of the gold detail were in place, and the top was done.


I didn't try to make the outfit a one-piece; I ordered some stretchy blue athletic shorts from Amazon and simply sewed some white stars onto them.  Comfortable and not too high cut.


The shorts were still fairly short however and female super hero costumes tend to be rather more revealing than male ones, and since I'd likely be wearing it around work colleagues, I decided an added skirt would be appropriate. I came across this great blue gauzy material with silver stars in the "seasonal" fabric section: apparently it's Christmas-y?  It was perfect for a skirt.  And, apparently, a cat tent.


Rather than make a full skirt, I just sewed the fabric to some more of the gold spandex as a waist band and added a fastening at the front so it would be open at front, but long at the back.  I also sewed lots of gathers into the skirt so that rather than hanging down straight, it hangs in gathers.

Wrist band and headband were easily sewn out of the same gold spandex.

I'd found the boots fairly cheaply on Zappos.com back around February, and I used white bandage tape to add the highlights. Add some flesh coloured stockings, and of course the invisible plane.

And so it was assembled!


This took a LOT of work, probably more than last year's dalek outfit, but everyone seemed to like it.  And it was actually pretty comfortable too - the headband (which was slightly too tight) and the contact lenses were the most uncomfortable parts.